
How long does it take to learn to kitesurf?
I’m asked this a lot.
On kite forums and kiteschool websites, I’ve seen people say anywhere from 6 hours to 12 months.
There’s no short answer to this question, except… “it depends.”
One, it depends on you. The more effort you put in, and the more prepared you are, the less time it will take.
We’ve had students who are physically fit, used to the ocean, and very focused on learning. Some of them had already learned similar sports like paragliding, windsurfing, and wakeboarding. They took the time to go through the lesson materials and Youtube videos we provide. They brought their questions to the Technical Sessions, and audited other students’ lessons. These students got through all the lesson points, and up and riding, in a few days. Shortly after that, they were more or less independent and riding around on their own.
For other students, it’s their first experience being out in the ocean, exposed to wind and waves. Getting comfortable in a new environment is a part of the learning curve, so they take a bit more time. But they’re still able to get through the steps OK.
Two: it depends on the conditions where you learn. In a few kite school spots around the world, you can take lessons on a huge beach, with lots of space and few other people around. The water is flat and waist-deep, the wind perfect. In these places, it doesn’t take a lot of skill or technique for students to “get on the board.” So, they can start making their first riding attempts in less time.
But it’s a trade-off. In these locations, people don’t need to learn basic deep-water survival and navigation skills. They’re not used to anything but the easiest of conditions. So they’re not prepared for most of the world’s kite spots (including ours). It takes them time to go back and learn the basics so they don’t get themselves (or others) in trouble. That’s why I recommend for people learn in a deep water spot. It takes a bit more time at the beginning, but pays off later.
Three: It depends on your school/ instructor. A good instructor has learned over the years how to use lesson time in an effective way. This involves understanding:
- which skills to introduce,
- in what order,
- how to develop each skill in the best way,
- which equipment to use (kite size, line length, board choice), and
- how to adapt to changing conditions and different students
A few simple instructor mistakes can end up wasting hours of a student’s paid lesson time.
And it’s tempting for an instructor to “babysit” their students, instead of teaching them to be independent and do things for themselves. All so that the students can get the board on their feet in minimum time.
Buried in the question “How long does it take” is another question: What does “being able to kite” mean? At what point can you say that you know how to kitesurf? We have a few reference points along the way that we use to measure your progress:
- “Independent in the water.” You can take care of yourself and your equipment, in deep water. You can launch your kite safely and get out into the water by yourself. You can do a basic self-rescue. When the kite falls on the water, you can relaunch it. You can navigate around to where you need to be, with or without your board. You can recover your board when you lose it. And you are aware of your surroundings. It may take about 6-12 hours to get here.
- “Waterstart and riding practice.” It takes repeated tries to get up on the board and ride. You may be riding for short distances, but not yet controlling your direction. You may be riding until you crash, instead of coming to a controlled stop. And you’re still ending up downwind every time and having to walk back up the beach to start again. Depending on your board skills, you may be at this level for some hours or a few sessions. And, the better you have been prepared for this level, the less time you will spend here. You are working toward the next point:
- “Staying upwind.” This is a huge milestone in your kiting progress! It means the ability to control where you are going, and actually work your way upwind. You are probably on a beginner board, and in easy conditions. You might sometimes still end up downwind, and have to do that “Walk of Shame.” But it’s happening less and less as you get better. Your relaunch and board recovery skills are getting smoother and smoother. This may take some hours, or days, or weeks, depending on your board skills and your overall kite control.
- “Competent Rider.” Here you can control your riding in a variety of conditions, on a regular size board. You’ve been putting the hours in, “paying your dues” as we sometimes call it. You’ve experienced some difficult situations, but have gotten better at sorting yourself out and getting going again. It’s no problem for you to perform a self rescue and get back to the beach on your own, with your board, if you need to. You know how to select your kite size and adjust the tuning before launching. You can launch your kite every time without any surprises for you or your helper. You can navigate around other kiters (this means knowing the Right-of-Way rules!) You can get back to the beach where you started from each time, and land your kite without drama. And you can judge for yourself if the conditions are suitable to go out in the first place.
After a couple of months, or a season of riding, you are past the beginner stage. maybe even making some jumps or starting to ride toeside. Now you can call yourself a kitesurfer! And you realise that “6 hours” to learn to kite is just not reasonable. In fact, you will never stop learning. So I would suggest to be wary of anyone telling you that you can learn to kitesurf after a few hours of lessons. There’s more to the picture.
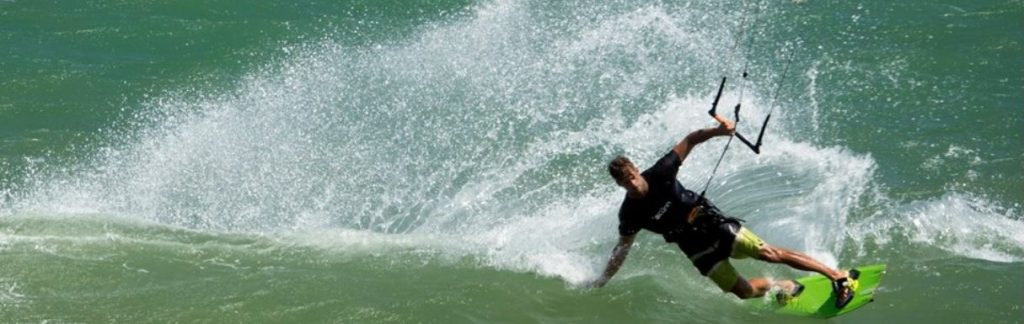
It’s fun to watch experienced kiters jumping high, doing tricks, and riding the waves. Remember, many of these people have been kiting for years. Don’t worry, just put the time in and you will get there!
Any questions? Do you want more information? Feel free to send me a mail: matt@jibesbeachclub.com or fill out the contact form.
What should I know before starting my first lesson?
As a kitesurf instructor for over 15 years and school manager I have watched thousands of people going through the learning process. It’s allowed me to spend considerable time learning how to tweak, fine-tune, and adapt the learning curve to each unique individual’s needs. Based on the responses from my best-performing students I would suggest thinking about the following before starting your kite lessons:
-Prepare yourself and have the right attitude. Expect to put in the time to get past the inevitable hurdles you will need to overcome, and that there will be many things you never realised you would need to learn. Read up, watch youtube videos and kiters and students in action, not only before starting but as you are learning. Be in good shape and very comfortable in deep water. Don’t show up for your lesson late or hung over (!) If you can, go along to watch and listen to other lessons in progress. This will help to round out and reinforce the things you have learned, and give you an idea what to expect in the next stages. At Jibe’s we call this “Lesson Auditing” and it’s free for anyone interested.
-It’s helpful (but not necessary) to learn wakeboarding first.
-Search out the best school/instructor rather than the cheapest one. This will not only end up saving you time, money, and aggravation in the long run but be safer for you and the people around you. Remember that you are attaching yourself to a potentially hazardous power source, and that cutting corners usually comes back later to bite you.
-Don’t waste your time flying a 2-line trainer kite. Those kites fly completely differently than the kites you use on the water, and can encourage bad bar-pulling habits. Instead, find a school that gives you a proper kite on very short lines right from the beginning, and keeps you on it until you are ready for longer lines.
-Fly that kite for hours and hours until you have an intuitive feel for it, can relaunch it in any wind condition, know how to do a self-rescue from start to finish, and can bodydrag circles around your board effortlessly before going to longer lines or attempting to ride. Good kite control takes more time than most people realise, but trying to ride without the necessary control will only cost you time, frustration, and put everyone around you at risk.
-Always practice 360 degree awareness, and follow good kite handling practices during your lessons and afterwards.
-Learn in a deep-water location. Otherwise you will be helpless in most kiting areas.
-Have fun and keep smiling!
The Alphabet Soup of Instructor Certification
How can I tell a good school or instructor?
As a beginning kitesurfer, a lot depends on your choice of kite school… and there is a lot of information to sort through to make this decision. Pricing policies, equipment, wind and water conditions during the lessons, and of course especially the quality of instruction all come into play. A number of competing organizations offer instructor licenses. VDWS, BPJEPS, PASA, IKO, BKSA, KA… Some are better than others, “instructor certification” is often used as a selling point, and schools are sometimes under pressure to hire only instructors holding a particular teaching certificate. Some of these organizations are actually proper governing bodies, either government-related or nonprofit national sports associations. And some are private companies with their motive being profit from generating instructor and student certifications and other sources.
Keep in mind that just because someone holds an instructor card, that does not mean that they are a good instructor. There are very skilled instructors out there who don’t have a teaching certificate, or who have chosen to let theirs expire. There are also plenty of poor and mediocre instructors in possession of a teaching cert. In fact, it’s not that hard to get a teaching license—in some cases it takes just a few days’ course. Some organizations take much more time than others to monitor their instructor’s teaching performance before issuing a license.
I’m going to offer some observations based on my experience from 18 years in the industry, which includes teaching, hiring, training, and observing many instructors in action.
When choosing a school or instructor, it’s a good idea to shop around and ask some questions either online or in person before booking. But observing a lesson in progress is really the best way to tell– if you know what to look for. Here are a few particular points you can take note of:
1) Before booking any lessons, does the school confirm that you are a good swimmer, and ask specific questions about any health or medical factors that may affect you during your lesson? These would include blood sugar issues, heart conditions, old injuries, etc. If you are booked in for a lesson without being asked this, it is a major red flag, and an indication of how much attention is paid to other important safety details as well.
2) Many schools offer packages containing a number of hours. Are you “locked in” by being required to pay for the entire package first, or can you decide as you go whether to continue with that school? It’s very tempting for a school to collect the money first, then run out the hours in marginal conditions in order to finish a package. Check policies for refunds and no-wind situations.
3) Look at the training materials and handouts available to the students. Is there a methodical lesson plan laid out with goals and skills to learn along the way, with safety standards clearly specified?
4) You should be made to feel welcome to observe any lessons in progress. Watch how the instructor interacts with their students, and listen to how well they explain technical points. You can also look for these specific things:
>Students are wearing safety gear
>Watch several times as a student’s kite is launched into the air—this is a crucial point in time and should not be rushed. Just before the kite is launched, do you see the instructor/ student make a careful back-line tension check, as well as a 360 degree scan of the area around them, every time?
>This is probably one of the best clues, as we see many instructors getting sloppy with this during lessons: Watch to make sure that care is being taken to avoid flying kites upwind or above people on the beach or in the water. One of the first and most basic safety principles of kiting is to keep the downwind area (within your kite lines’ radius) as clear as possible. This is because the kite or lines can do significant damage if they strike a person. It’s bad practice for either a student or an instructor to fly a kite with long lines any more than necessary where there are people downwind; this includes walking up the beach with the kite in the air.
5) It’s a good indication to a look at the school’s beach and launching/landing area. Does it look organized and clear, or are there kites and lines and people cluttering up the place? Are people launching and landing their kites too close to others? Are they standing around or walking through the area with their kite in the air? In a well-managed launch zone, kites are launched and caught close to the water’s edge, and are only in the air for the time it takes to move to and from the water.
In my experience and observations, the two highest level instructor certifications come from BPJEPS (France) and VDWS (Germany). But keep in mind that no one particular organisation’s methods should be considered the standard for all others to follow in every situation. Each student, instructor, and location are unique and a good instructor continuously takes all these into account during a lesson. Ultimately, each school’s management tends to have more of an influence over the instructors’ methods and practices than whatever certification they happen to hold.
Launching Procedures and Problems
Here’s a post I put up on kiteforum.com: Launch failures
We get no shortage of chances to see people stuffing their launches near our spot.
In the last couple of weeks I’ve seen two failed launch situations where a kiter lost control of their kite. In one of them, the kiter flew through the air and landed on the beach within a metre of smashing her face on a parked jetski. In the other, the kiter got dragged down the beach and crashed his kite just beside some bystanders. This kiter (former policeman) then got angry and yelled at both his helper and the people in the launch zone who came to check on things. It was a tense moment.
Launching your kite is one of the most vulnerable times for you as a kiter, because there are a lot of unknown variables that need to be addressed before the kite goes in the air. Is your kite the right size for the conditions? Is the tuning adjusted correctly? Is the wind quality sufficient for you to be kiting in? Have you positioned yourself in the right place for a smooth, uneventful launch?
The vast majority of launch accidents are caused by either:
1) The kiter moving too far upwind before pulling the lines tight, or
2) Failure to do the “back line tension check” before launching.
In the case of the yelling man, he was in a rush to get his kite up in the air and go out. He’d come all the way from Europe, and had to wait a couple of days to kite because the wind wasn’t suitable when he first arrived. He was already tense and impatient. He set his kite up, hooked in, and the helper started to move the kite into position. But then he walked upwind without checking his “across the wind line” first, and stepped back to tension his lines. The kite was already deep in the wind window, so it overpowered and ripped out of the helper’s hands. This “hot-launch” dragged him down the beach a few metres, before his kite crashed just beside some bystanders.
In the case of the flying girl, she was a fairly confident kiter, able to jump, ride a surfboard and do tricks. But when she went to launch her kite, one of the back lines (the top one) was wrapped around the tip of the kite. The back line, being effectively shorter, turned the kite back and sent it up through the wind window. This yanked her up through the air, and she narrowly missed injury as she was pulled back down to the ground beside the jetski.
Neither of these accidents needed to happen, and both could have been prevented with a good launch procedure, complete with all the checks. And both of happened because of a problem that went unnoticed until far too late.
A good launch procedure (you can see ours on the lesson syllabus) addresses all these issues before the kite leaves the helper’s hand.
It’s very common for people be too far upwind of the kite when they pull their lines tight. It’s a result of not taking the time to be aware of the wind direction; that’s what happened to the angry policeman. He also made the mistake of hooking in too early in the procedure. This compounded his mistake, so he was already connected to the kite when it powered up.
The girl who flew through the air skipped a very important but often-missed part of a good launch procedure: the back line tension check. It’s one of the last checks we do, after moving into position and hooking in (which should be as late in the process as feasible). Just before the 360 degree check, and the thumbs up, we:
SHEET OUT all the way to check for depowerability.
SHEET IN to check (feel) for sufficient & equal tension in the back lines.
Even for experienced kiters, one of those back lines sometimes get wrapped around the tip or there is some other problem with the lines/bridle, and the helper might not notice it. This “back line tension check” is meant to catch those issues before the launch- you’ll notice it when you sheet in. It will also tell you if your kite is tuned properly, if you’re standing in the right place, and if the wind conditions are suitable and matched to your kite size.
As we say when this kind of thing happens… the root cause was NOT that the back line was wrapped around the tip of the kite. This happened because the kiter did not do their pre-launch checks properly.
So do your checks carefully, every time. Take those 4-5 seconds to make sure that the kite feels like it’s flying already, and your helper can hold the kite lightly. And if something doesn’t feel right, don’t just launch and hope you can sort it out when the kite is in the air– stop and look for the source of the trouble.
I see kiters all the time casually getting into place and giving the thumbs up without doing all the careful checks first. In fact, when things go wrong, that’s usually what I’ve seen just beforehand. Then, right after the incident they often say something like, “This NEVER happens!”
It was interesting to note the reactions of these two people to the situations they caused.
The ex-cop powered up his kite by going too far upwind, too soon. It knocked his helper down and endangered the people nearby when it crashed. And yet, he was angry. Not at himself, but at everyone else. He blamed his helper and yelled at the people who tried to contain the situation. It was a rare case where I had to invite someone not to use this launch spot again. I didn’t ban him because he caused a dangerous incident. I did it because he wasn’t willing to sit down and talk through what happened, and learn from it for next time.
The girl crashed her kite into the neighbor’s trees, and we had to shut down the launch site while we sorted everything out for her. The people waiting to go out after her had to wait some more until the area was cleared. Instead of apologising for the trouble she caused, she was so focused on getting kiting that she launched again and went out without even a thank you. Later I debriefed her on the situation, and suggested that this was a great chance for her to help others with what she’d learned from her experience. Her response: “Yes I can advise them. For $20 per hour.” And the next times i watched her launch her kite, she still gave the thumbs up signal without doing her checks.
Your mindset when you kite will have a huge impact on yourself, and on the other people who share the area with you. Impatience and a cavalier attitude are your two greatest enemies. Let’s use our experience to help each other.
Waterstarts and First Riding
I’ve seen it over and over again.
A kitesurf student is learning to kite, eager to get up on the board and riding, and their instructor has given them long lines with a full size kite. They make one or two waterstart attempts, then crash their kite or lose the board… and are totally lost. They may drag back to shore and then have to go out again to look for their board. Or they may end up spending loads of time with the kite on the water not knowing what to do. Then they come back to shore later with a spaghetti mess of tangled lines. Or, they’ve gotten themselves so far downwind by the time they sort themselves out that they have to come back to the beach anyway and walk back upwind again.
Anywhere from 15 to 45 minutes later, they are in position and ready to try again. One waterstart attempt, and then the same thing happens all over again. After a couple of runs like that we often see them trying to get riding with a series of weak “half-powerstrokes” to little effect. They’ve become afraid of getting pulled over their board and having to go through the whole process again.
In two hours of lessons they may have spent a total of just a few minutes actually practicing their riding. The rest of the time? Wasted. Worse, they may crash their kite onto other people in the water or on the beach because they haven’t yet gotten comfortable enough to “look past the kite” and be aware of who or what is around them.
Why does this continue to happen?
There are a couple of reasons. One, their last lesson may have happened in one of the very few “super easy” kitesurf spots in the world where they were in waist- deep water with smooth wind, no waves, and lots of beach space. So they never had to learn the basic self-sufficiency techniques that every kiter should know.
The second is about mismanaged expectations. In the fierce competition for students, many kite schools claim that they will be able to get their students “up and riding” in a few short hours. Students as well are often in a hurry to feel the experience of riding as soon as possible. Who can blame them, everybody wants to ride! But then the “getting up and riding” promise turns out to be a 2-second ride, followed by a crash, then lots of wasted, unglamorous recovery time. At that point the whole learning process grinds to a slow crawl. It’s very frustrating for the student. How do we fix this all-too-common problem?
Taking the time to learn the basics first saves huge amounts of time later.
We’ve learned over the years that there is no substitute for actually spending the time to help our students become prepared for that “golden moment” when they make their first waterstart attempts. And it requires learning some specific skills to become ready for this. But then, when they lose their board or crash their kite, it’s a matter of a few seconds before they are back in position and ready to try again, instead of half an hour. And yes, losing your board and crashing your kite happens a lot at this stage!
Before teaching the waterstart, we make sure that each kiter can:
-Relaunch their kite pretty much every time in the conditions they are in. Relaunching in lighter wind requires a bit more technique.
-Safely and efficiently perform a self rescue if necessary, and get back to the beach quickly with their board.
-Put (and keep) their board on their feet by themselves while keeping the kite stable at 12:00 o’clock.
-100% board recovery. This is a whole set of skills needed to navigate and bodydrag in any chosen direction (including a high angle upwind), so that getting the board back is quick and easy.
Keeping the kite stable with one hand, restabilizing a kite when losing control, changing directions without losing upwind ground. Controlling how much power is coming from the kite and from what direction, 360 degree awareness, search strategies… these are the necessary basics. And interestingly enough, it’s much faster to learn these skills on short lines (even down to 5m!) before moving to long lines.
We’ve found that during the process of teaching bodydrag navigation and board recovery, the student also has to learn the kite control skills they’ll need anyway for their waterstart. Someone who already has good enough kite control can usually be taught the board recovery techniques in about 10-15 minutes.
The vast majority of students who come to us asking for help with their waterstarts and first riding are actually not really prepared for it after all.
And they generally are unaware that they still need to learn a few more things before they can effectively practice their riding. So we need to carefully assess the skills that they already have, identify the gaps that need to be filled, and help them become aware of how important it is to learn the fundamentals.
That’s time well spent.